 When it come to certain things, I’m as frugal as they come. Take targets for example. Rather than go to a big box store and pick up a pack of targets for a few dollars, I’ll print my own. I know that in the long run it is actually more cost effective to purchase rather than print, but it just bugs me to have an instant out of pocket cost for something that I’m going to blow holes into.
To avoid that instant hit to the wallet, I like to turn to the internet and my laserjet printer. Through various websites, I’ve collected about a dozen letter size targets that can easily be printed and taken to the range. On occasion, I even take it a step further and print large format targets at the office. I like to think that I’m putting the last bit of paper on 150′ rolls to good use instead of throwing it out.
To take my frugalness to the next level, I decided to make my own IDPA Targets. The nice thing about these targets is that they require no paper or ink, just scrap cardboard (Which as a father and homeowner, I seem to get on a regular basis). To create these very simple targets, I needed to make a template. I would then use this template to trace a shape and mark scoring zones.
The hard part was finding a full scale IDPA Target that I could turn into a template. The easiest thing to do would have been to purchase an IDPA Target but the closest gun shop with them in stock was a thirty minute drive. What I did instead was find a one-third scale version meant to be printed on letter size paper. I dropped this image into AutoCAD (I’m a draftsman) and traced over it. Once my target was created, I scaled it up to proper size. Once scaled, I played around with the lines until dimensions seemed logical.
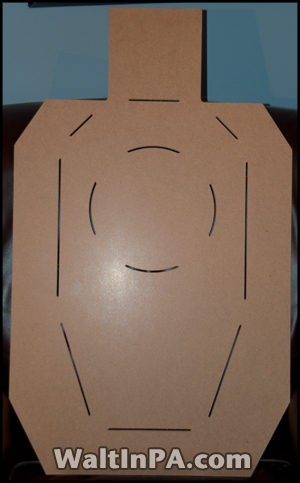
With my IDPA Target now drawn up in AutoCAD, I transfered it into a CNC Program so that it could be cut out of a piece of quarter inch masonite. The image at the head of this post is my finished template. I simply drop it onto a piece of scrap cardboard, trace it with a permanent marker, then mark the scoring zones with a pen or pencil.
If you would like to make a template of your own, I have included a dimensioned target that you are free to download. With it you can lay out your template on a piece of cardboard. For a more durable template, lay it out on a piece of paneling from a home improvement store. The easiest thing to do, however, would be to pick up an IDPA target and use it to create future targets.
Downloads:
- Full Scale IDPA Target (24×36 Sheet Size)
- 1/3 Scale IDPA Target (8.5×11 Sheet Size)
- IDPA Target Template (8.5×11 Sheet Size)
- IDPA Target DXF File (AutoCAD 2013)

Ask The Readers
When it comes time to head to the range,
do you take home made or store bought targets?
11 thoughts on “Making my own IDPA Targets”
Comments are closed.
Recent Posts
From Group Ride Roasts to Real Life: My YouTube Channel Update
Well, my lovelies (I realize that sounds weird but at this point I need to lean into it), it's time for some real talk about where I've been and what's been happening behind the scenes at Walt in...
Reconnecting with friends, exploring scenic Pennsylvania back roads, and enjoying the simple pleasure of two wheels Getting the Band Back Together Today was a pretty special day in the...
I used to steal real estate signs and use them for target frames. Worked wonderfully.
John,
I’ve been told that after any given election there were literally hundreds of targets available for the taking. I’ve never tried using them, but it is a great way to recycle something that would otherwise be thrown out.
Thanks for the tip and comment
That is a really great idea that I never thought of. After every election 95% of the signs that supports put out get left behind to litter our yards and streets. I usually end up collecting several hundred of them, bundling them up and recycling them. Now I have an ever better way to recycle them.
Thanks for taking the time to post the template Walt. I was bundling cardboard to take to the recycle center and a couple pieces looked big enough for idpa targets. So I hit google and found your template. Perfect.
Steve,
I’m glad I could help.
Thanks for leaving a comment.
If you have an account with a certain shipping company (think Brown), you can get free full-size 8 1/2 x 11 label (50 count per order). Print directly on this and just stick to your target. Many other sizes available. We keep a bunch printed and in our range tote. I’ve also been recruited by the local wine maker to make labels which has some nice benefits. Doesn’t cost me a dime and only takes a second to hit print.
Thanks for posting the targets. I print them off on brown paper & take ’em to the range, where, due to the 1/3 scale, a 10ft shot can simulate a 10yd shot, etc.. Also, I scatter them around the man-cave and use them for dry-fire practice; if you shrink ’em down further you can simulate even greater distances. These have been a great help to me, thanks again.
Walt – Many thx for the target graphics. I just started idpa and this will help me train using a standard target, brown with little or no bullet for my old ,aging eyes. I will start dry-fire practice with it using the 1/3 scale target and the same lighting that our range has. Thx again.
I work at a local grocery chain and always get LARGE sheets of cardboard from our pallets to use. This is stuff that would otherwise be put in balers and recycled but i get to use it first and then take it in for recycling at the store
Hi, so if I print the 1/3 scale, how far should I stand to simulate being 5, 7, and 10 yards?
the exact dimensions of the target are listed in the idpa rules and regulations pdf,
i used it to make my own with autocad as well lol, great minds think alike!
i also made some uspsa for a friend of mine.